baconwrappedbarbells


2 Comments

Honey, Lime and Garlic Chicken Wings

IMG_4295

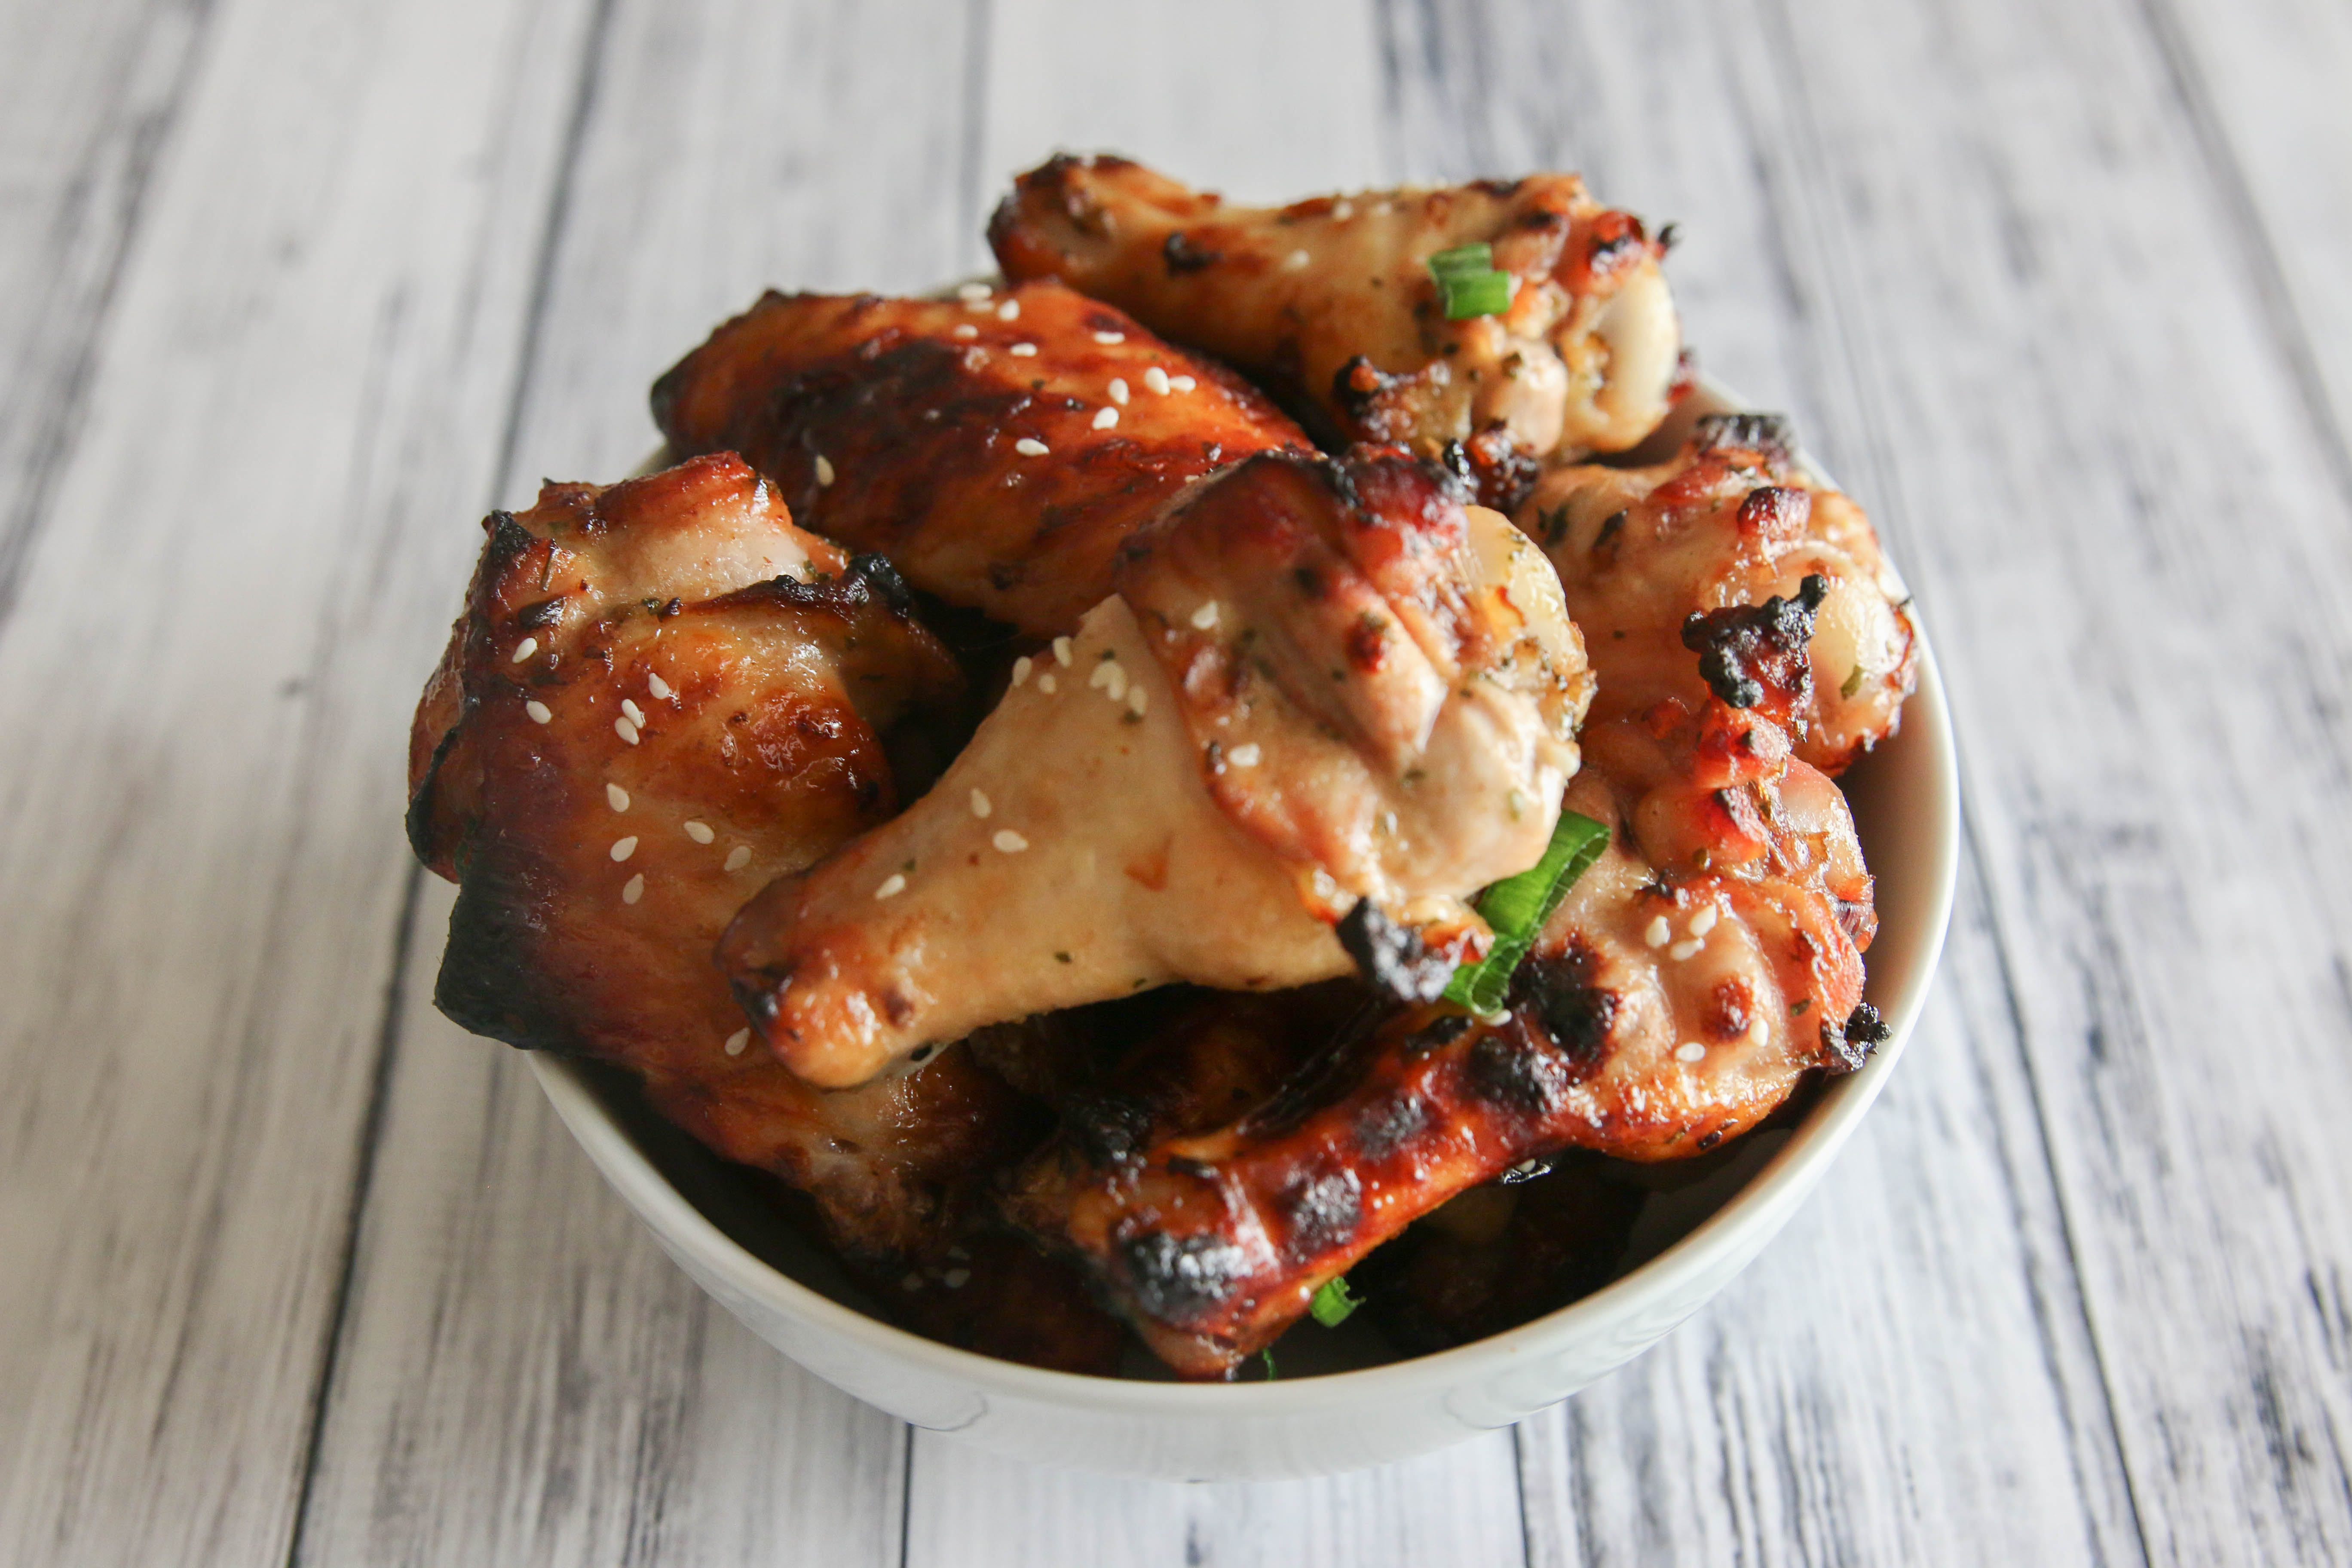
Honey. Check. Lime. Check.  Garlic.  Check.  The results; a marinade for chicken wings that results in a sweet and spicy dish with just a hint of heat from the addition of red pepper flakes.

IMG_4345

I went to the grocery store a couple of weeks ago looking for new salad dressings to try out.  Sometimes I get into a food rut, and I wanted to branch out from my usual go to salad dressing of extra virgin olive oil and balsamic vinegar.  Unfortunately, most of the store bought dressing options included ingredients that I don’t consume on a regular basis as part of a Paleo/Primal/clean eating diet, such as soybean and canola oil, soy sauce and cane sugar.  However, several of the ingredients in the salad dressings; specifically honey, sesame oil, and garlic, peaked my interest, and gave me the idea to create a recipe for chicken marinade using those ingredients as part of the marinade recipe. After a couple of tweaks to the recipe and some trial and error, the end result is this delicious recipe for Honey, Lime and Garlic Chicken Wings.  Enjoy!

IMG_4338

Honey, Lime and Garlic Chicken Wings Servings: serves 4-6


Ingredients:

  • 3 pounds of chicken wings
  • 1/4 cup sesame oil
  • 1/4 cup coconut aminos
  • 2 tablespoons honey
  • 1 tablespoon lime juice
  • 1 1/2 teaspoons minced garlic (approximately 3 large cloves)
  • 1 teaspoon dried cilantro
  • 1 teaspoon dried oregano
  • 1 teaspoon cumin
  • 1 teaspoon sea salt
  • 1/2 teaspoon black pepper
  • 1/8 teaspoon red pepper flakes

Instructions:

  1. Place the chicken wings in a large bowl.  Sprinkle sea salt and pepper on the chicken wings, and toss to evenly coat.
  2. Place the chicken wings in a large resealable bag.
  3. Place the remaining ingredients in a medium size bowl, and whisk  thoroughly to combine.
  4. Pour the marinade mixture over the chicken to coat and seal the bag tightly (making sure to remove as much of the air from the bag as possible before sealing).
  5. Refrigerate the marinated chicken for 4-6 hours (can refrigerate overnight).
  6. To cook the chicken, preheat the oven to 400 degrees.
  7. Line a baking sheet with aluminium foil.  Place a cooling rack over the aluminum foil.
  8. Place the chicken wings in a single layer on the cooling rack.
  9. Bake the chicken in the oven for 25 minutes.
  10. After 25 minutes, remove the chicken from the oven, flip over, and place back in the oven.
  11. Continue cooking the chicken wings until wings are cooked through, approximately 25 minutes more.


Leave a comment

White Chocolate, Lemon and Coconut Date Balls

IMG_0080

I created this recipe for White Chocolate, Lemon and Coconut Date Balls out of a strong desire to eat body lotion.  WAIT WHAT????????

Okay, let me back track a little bit, I don’t want you to think I’ve gone completely mad.  One of my co-workers is very passionate about using skincare products that are effective, natural, safe and made with minimal to no chemicals or other harmful toxins.  So passionate in fact, that she supplies high quality soap and hand lotion for employees at my job.  The most recent jar of hand lotion she provided was scented with coconut and lemon.  I really love its light and airy scent.

One day, I was feeling the munchies pretty bad (it was clearly time for a high protein snack, but I digress).  After using the lotion and smelling it on my hands, I thought to myself, this smells good enough to eat!  Thankfully I resisted the urge to consume the body lotion.  I also immediately started brainstorming ways to combine the flavors of coconut and lemon into a tempting treat.

This recipe is an adaptation of my orange and dark chocolate energy balls.  The link to that recipe can be found here.

IMG_0136

For those of you who love coconut, this recipe uses several different kinds of coconut products; shredded coconut, coconut oil and coconut butter,  adding several layers of texture to the overall coconut flavor in the date balls.

The white chocolate and dates add sweetness, and the lemon extract and lemon zest give the date balls a burst of lemony freshness and zing.

IMG_0100

These date balls are perfect to bring to a party.  Your friends will be very happy if you make these to share.  Enjoy!

White Chocolate, Lemon and Coconut Date Balls

Servings: makes 27-30 date balls


Ingredients:

  • 2 cups almonds
  • 15 mejool dates, pitted
  • 1 cup shredded coconut, divided
  • ¾ cup white chocolate chips
  • ½ cup coconut butter
  • 2 tablespoons coconut oil
  • 2 teaspoons pure lemon extract
  • 2 teaspoons vanilla extract
  • Zest from one lemon
  • 1 teaspoon sea salt

Instructions:

  1. Place the almonds in the bowl of a food processor. Pulse almonds in food processor until they form small crumbs. Pour the almonds into a large bowl, and set aside.
  2. Place the mejool dates in the food processor, and puree until smooth.
  3. Add the almond crumbs back into the bowl of the food processor. Reserving ½ cup of shredded coconut, add the remaining ingredients into the bowl of the food processor, and process until the ingredients have fully incorporated, the mixture becomes sticky and you can form the dough into balls.
  4. Line a large baking sheet with parchment paper.
  5. Place a golf size ball of the almond coconut mixture in the palm of your hand, press the dough together and roll into a ball. Once the ball has been rolled, place on the parchment lined baking sheet.
  6. Repeat with the remaining mixture.
  7. Pour ½ cup of shredded coconut onto a large plate. Roll a date ball in the coconut mixture, and place back on the parchment lined baking sheet after it has been coated with the shredded coconut.  Repeat with the remaining date balls until each one has been coated with shredded coconut.
  8. Place the baking sheet with the date balls in the fridge for 20-30 minutes (or in the freezer for 10-15 minutes) to become firm.
  9. After 10-15 minutes, take them out of the fridge (or freezer), serve and enjoy! The remaining date balls should be kept refrigerated or frozen.


Leave a comment

Slow Cooker Chili

IMG_0027

Peanut butter, sugar, beer, pickle juice and chocolate.  What doe these things have in common?  These are some of the things people swear by when making chili.  I was somewhat surprised by the type and variety of ingredients people add to their chili recipes when doing research to create my own slow cooker chili recipe.  In addition to the ingredients mentioned above, I also viewed recipes that called for coffee, masa (made from corn and used as thickener to get chili to desired consistency), cinnamon, corn and siracha sauce.

IMG_0035

Chili is a versatile dish that can be created a variety of ways.  I’ve seen recipes for southwest chicken chili, beef and butternut squash chili, chipotle steak chili, turkey and bean chili, bison chili and vegetarian chili.  No matter what your preference, there is a chili recipe out there to please your taste buds.  As far as chili recipes go, I’m a chili purist; I like to use traditional ingredients found in standard chili recipes (you won’t find pickle juice or siracha sauce in the slow cooker chili recipe) and hold firmly to the belief that there should be no beans in a bowl of chili.  This has less to do with the ongoing discussions within the Paleo/Primal community regarding consumption of legumes as part of a healthy diet.  I’m less concerned with this issue, and more concerned with beans ruining my meaty bowl of goodness.  As Texas chili champ Wick Fowler so eloquently stated, “If you know beans about chili, you know that chili has no beans.”

IMG_0068

No matter what your chili persuasion, I think you’ll love this recipe!  Allowing the ingredients to cook low and slow in the slow cooker results in a thick, smoky, flavorful bowl of chili.  I like to prep this chili on Saturday night, adding all of the ingredients into the slow cooker before heading to bed.  When I wake up the next morning, it is ready (making my Sunday morning meal prep a breeze)!

Enjoy, and please feel free to share in the comments below if you try this recipe!

Are you team beans or team no beans?

Slow Cooker Chili

Servings: serves 6-8


Ingredients:

  • 2 pounds chuck roast, cut into 1/2 inch cubes
  • 1/2 pound bacon, sliced
  • 1 yellow onion, diced
  • 1 red bell pepper, diced
  • 1 green bell  pepper, diced
  • 28 ounce can diced tomatoes
  • 6 ounce can tomato paste
  • 4.5 ounce can chopped green chilies
  • 2 cups beef broth
  • 8 garlic cloves, minced
  • 1/4 cup chili powder
  • 1 tablespoon cumin
  • 1 tablespoon oregano
  • 2 teaspoons paprika
  • 2 teaspoons sea salt
  • 1 teaspoon coriander
  • 1 teaspoon ground black pepper
  • 1/2 teaspoon cayenne pepper

Instructions:

  1. Pre-heat a large skillet over medium heat.  Add bacon slices to the skillet to cook, flipping once halfway through.  Fry bacon until just crispy.
  2. While the bacon is cooking, line a large plate with paper towels.  Once the bacon is finished cooking, remove skillet from heat and place the bacon slices on the paper lined plate to drain.  Once the bacon has cooled and is safe to handle, crumble the bacon into small pieces.
  3. Pour the excess bacon grease from the skillet into a small bowl, reserving 1 tablespoon of the grease in the skillet.
  4. Place the skillet back on the stove over medium heat.  Warm 1 tablespoon of the reserved bacon grease in the skillet.  Add the diced onion and peppers to the skillet, and sautee for approximately 8-10 minutes until the vegetables have softened.  Once the vegetables have finished cooking, add them to the bowl of the slow cooker.
  5. Place the skillet back on the stove over medium to medium-high heat.  Warm 2 tablespoons of the reserved bacon grease in the skillet.  Add the chuck roast cubes and sear the meat until browned, stirring occasionally to make sure that the chunks don’t stick together while browning.  Once the meat has browned, remove the skillet from the heat and add the meat to the bowl of the slow cooker.
  6. Add the remaining ingredients to the bowl of the slow cooker, and mix until thoroughly combined.
  7. Cover the bowl of the slow cooker with the lid, and cook on low for 10-12 hours.
  8. Once the chili has finished cooking, ladle the chili into serving bowls and top with your favorite chili fixings (i.e. cheddar cheese, cilantro, diced red onion, sour cream, etc.)

IMG_0040


Leave a comment

Yellow Squash, Fried Shallot and Bacon Quiche

IMG_8003

Some things are just meant to go together; milk and cookies, chocolate and peanut butter, bacon and well, pretty much everything!  I’ve been wanting to make another quiche recipe for a while.  I just love the way a quiche allows different ingredients to come together in combination with eggs and coconut milk to create unique and incredible flavor combinations.  In my first forage into making a quiche, I created a recipe for Balsamic Vinegar Glazed Caramelized Onion, Bacon and goat Cheese Quiche.  The recipe for it can be found here.  As it turns out, by making this new recipe, I can add another group of foods that are definitely meant to go together, yellow squash, fried shallots and bacon.

IMG_8031

When I first came up with this recipe, I planned on using zucchini as the base of the quiche.  In fact, the first two times I made this quiche, I used zucchini.  However, when I went to the grocery store to buy the ingredients to make the recipe for the third time as part of my recipe development, I learned that the store hadn’t gotten in their daily shipment of vegetables that morning.  In a fit of genius inspiration (and the fact that I didn’t want to go to another grocery store to shop for food), I decided to grab two yellow squash as a substitute for the zucchini.  For most people, yellow squash and zucchini are interchangeable, and there isn’t suppose to be much, if any, type of difference is flavor.  Therefore, I wasn’t to concerned about the swap.  But when I used the yellow squash in the recipe, for some explainable reason, the flavor of the quiche turned out even better.  I’m not sure if  the difference in taste was psychological, or the grocery store had a really good shipment of yellow squash over the past couple of weeks, but the results of this squash swap turned out pretty great, if I do say so myself.  I got third party confirmation of the better taste of this quiche from two of my friends, so my results are obviously steeped in heavy scientific research and are completely legitimate ;).

IMG_8019

This recipe calls for a pre-made pie crust.  My go to recipe for a gluten-free pie crust can be found in Danielle Walker’s Paleo cookbook Against All Grain (one of my favorite cookbooks for amazing Paleo, Primal, gluten-free and grain-free recipes).  There are many Paleo friendly pie crust recipes available.  Check out this almond flour pie crust from Elena’s Pantry, or this recipe for a savory pie crust from the Grain Free Kitchen.

This quiche would be perfect for breakfast or dinner.  I served this quiche alongside pan roasted asparagus, and it made for a scrumptious and filling meal.

Please let me know your results in making this recipe by leaving a comment below.  I really enjoy reading about your experiences in making the recipes I share!

Yellow Squash, Fried Shallot and Bacon Quiche

Servings: serves 6-8


Ingredients:

  • pre-made pie crust
  • 2 medium yellow squash, thinly sliced
  • 7 eggs
  • 1 cup mozzarella cheese (optional)
  • 1/2 cup coconut milk
  • 1/2 cup olive oil
  • 2 shallots, thinly sliced
  • 4 slices bacon
  • 1 tablespoon butter
  • 4 cloves garlic, minced
  • 1 tablespoon Italian seasoning
  • 2 teaspoons sea salt
  • 1 teaspoon ground black pepper

Instructions:

  1. Heat olive oil in a medium skillet over medium heat.
  2. While the oil is heating, line two plates with power towels.
  3. Once the oil in the skillet is hot, add the shallots and fry for approximately 10-12 minutes, stirring frequently while they cook until the shallots begin to brown.
  4. Once the shallots have browned, remove the skillet from the heat, and scoop the shallots out of the oil on place on one of the paper towel lined plates in order to get rid of the excess oil.  Once the shallots have drained and cooled, crumble them into smaller pieces and set aside.
  5. In a separate large skillet, add 4 slices of bacon.  Place the skillet on the stove, and cook the bacon on medium heat until the bacon is cooked through to desired consistency (I like my bacon cooked just until slightly crispy).  Remove the skillet from the heat, and place the bacon in the second paper towel lined plate in order to drain the bacon grease.  Once the bacon has cooled, crumble the bacon into small pieces and set aside.
  6. Wipe down the large skillet used to fry the bacon, and place the skillet back on the stove over medium-high heat.  Once the skillet has heated, add 1 tablespoon of butter to the skillet and allow the butter to melt.
  7. Add the minced garlic to the skillet, and sauté in the melted butter for 15 to 20 seconds.  Then add the yellow squash to the pan, and continue to sauté the yellow squash and garlic over medium-high heat until the yellow squash becomes tender, approximately 5-7 minutes.  Remove the skillet from the heat and allow the squash to cool slightly.
  8. Preheat the oven to 375 degrees.
  9. In a large bowl, whisk together the eggs, Italian seasoning, salt and pepper.
  10. Add the coconut milk to the egg mixture, and whisk further to throughly combine.
  11. Add the mozzarella to the egg mixture, and stir to incorporate (if using cheese).
  12. Lay the yellow squash all along the bottom of the pie crust, making sure that the yellow squash is evenly layered.
  13. Next sprinkle the fried shallots evenly over the squash.  Then sprinkle the bacon over the fried shallots.
  14. Pour the egg/coconut/mozzarella cheese mixture into the pie pan over the pie filling.
  15. Line a baking sheet with foil.  Place the pie dish in the middle of the baking sheet,  and cover the top of the quiche with foil (make sure the foil is tented over the quiche so that the foil does not touch the top of the quiche before it goes into the oven, or else the foil will stick to the top and be difficult to remove – learned that the hard way).
  16. Place the baking sheet with the quiche in the middle of the oven, and bake the quiche covered, for 45 minutes.
  17. After 45 minutes,  remove the baking tray from the oven and take off the foil from the top of the quiche.
  18. Place the baking tray back in the oven and continue cooking the quiche for 15-20 minutes.  Once it is done baking, take the baking tray out of the oven and let the quiche cool on the counter for for 5-10 minutes before serving.
  19. Eat up!


Leave a comment

Cinnamon and Browned Butter Mashed Sweet Potatoes

This recipe for Cinnamon and Browned Butter Mashed Sweet Potatoes is minimal on steps, but large in flavor.  The browned butter gives the sweet potatoes a rich nutty taste, and the coconut milk adds a creamy texture to the dish.   At first this seemed too simple to call a recipe, but I decided to go ahead and post it on the blog because it was something I really wanted to share with you guys!

IMG_6640

These mashed sweet potatoes go really well with my recipe for Slow Cooker Balsamic Pot Roast.  Throw in some roasted Brussels sprouts or green beans, and you’ll have a meal to please the entire family!  I have been tempted to eat these sweet potatoes as a meal on its own, but I have been able to resist that urge (though barely).

IMG_6647

I hope you guys enjoy these sweet potatoes as much as I do.  If you make this recipe, please feel free to share your results in the comments below.  I always love reading your experiences making the recipes I share on the blog!

Cinnamon and Browned Butter Mashed Sweet Potatoes

Servings: serves 4-6


Ingredients

  • 3-4 large sweet potatoes (approximately 3 1/2 pounds)
  • 1/4 cup butter
  • 1/3 cup canned coconut milk
  • 2 teaspoons cinnamon
  • 1 1/2 teaspoons sea salt

Instructions:

  1. Preheat the oven to 450 degrees.
  2. Line a baking tray with foil or parchment paper.
  3. Place the sweet potatoes on the lined baking tray.
  4. Once the oven has finished preheating, place the tray in the oven and bake the sweet potatoes until they are done, approximately 90 minutes (you’ll know the sweet potatoes are done if you can pierce the flesh of the potato easily with a knife or fork).
  5. Take the sweet potatoes out of the oven, and set aside to cool.
  6. Place the butter in a small saucepan, and then place the saucepan over medium high heat.
  7. Melt the butter in the saucepan.  After the butter has melted, it will begin to foam.  Stir the butter constantly over the heat until the milk solids in the butter begin to brown.  As the butter browns, it will give off a slightly nutty aroma.  As soon as the solids turn brown and give off the nutty aroma, remove the butter from the heat immediately and set aside.
  8. Once the sweet potatoes have cooled enough to handle, peel the skin from the potatoes, and place the  sweet potato flesh into a large bowl.
  9. Add the browned butter, cinnamon, coconut milk and sea salt to the large bowl, and mix everything until thoroughly combined.
  10. Place in a serving bowl, and serve alongside your main course.


4 Comments

Slow Cooker Honey Balsamic Pot Roast

IMG_4212

Happy Friday!  This weekend is going to be packed full of fun things.  I’ll be volunteering as a judge at Fittest in OK, a local CrossFit competition hosted by my gym, CrossFit 405.  The competition will be held at Cox Convention Center January 24 and 25, and will feature some great athletes from around Oklahoma.  If you live in or around the area, come by and check it out!

I love volunteering as a judge for local competitions in Oklahoma.  It’s great watching people from all types of athletic backgrounds (from people just starting out, to semi-seasoned pros) lay it out all on the floor once the clock counts down; 3……2……1… go!  I’ve participated in several team competitions over the years (but have not competed as an individual….yet!).

I’ll be volunteering both Saturday and Sunday, which will take up a majority of my weekend.  Thankfully, I was able to meal prep last weekend, and made several things that will help me be ready for next week since I won’t have much time to spend in the kitchen this weekend.  I’m a big fan of prepping food during the weekend.  Knowing that I spent a couple of hours during the weekend cooking up proteins and chopping veggies to create quick and delicious meals helps take the stress off of worrying about what I’m going to eat when I get home from work during the weekday.

This recipe for Slow Cooker Honey Balsamic Pot Roast is a great addition to any meal prep.  The combination of sweetness from the honey and the tangy kick from the coconut aminos help the flavors in sauce come alive!  In addition, slow cooking the pot roast over low heat allows the sauce to tenderize the meat, and the result leaves you with fork tender bites of pot roast.

IMG_4173

I originally made this recipe as part of Christmas dinner last year when I was in Houston for the holidays.  Since then, I’ve made it several times over the past month.

This recipe would be great paired with my Roasted Sweet Potatoes and Brussels Sprouts.  It also goes well with mashed sweet potato, and I’ve got a new recipe for mashed sweet potatoes that I’ll be sharing with you next week.  Until then, please enjoy this recipe for Slow Cooker Honey Balsamic Pot Roast.

If you try this recipe, please let me know what you think.  I love reading your comments!

IMG_4229

Slow Cooker Honey Balsamic Pot Roast

Servings: serves 8-10


Ingredients

  • 3 1/2 – 4 pound boneless chuck roast
  • 2 tablespoons cooking fat (i.e., lard, butter, olive oil, avocado oil, coconut oil)
  • 2 large onions, peeled and thinly sliced
  • 1 cup beef broth
  • 1/2 cup balsamic vinegar
  • 2 tablespoons coconut aminos
  • 1 1/2 tablespoons honey
  • 1 teaspoon dried thyme
  • 1 teaspoon dried rosemary
  • 4 cloves garlic, minced
  • sea salt
  • ground black pepper

Instructions:

  1. Heat cooking fat over medium high heat in a large skillet.  While the fat is heating, liberally season both sides of the chuck roast with salt and pepper.
  2. Add the chuck roast to the preheated skillet, and sear on one side for approximately 7-8 minutes until browned.  Then flip over and sear the other side of the chuck roast for 7-8 minutes.
  3. While the meat is cooking on the stove, in a medium sized bowl, mix together the beef broth, balsamic vinegar, honey, coconut aminos, thyme, rosemary and minced garlic.
  4. Remove the skillet from the heat, and set the chuck roast aside on a large plate.
  5. Remove all but one tablespoon of cooking fat from the skillet, and then place the skillet back on the stove (with the 1 tablespoon of cooking fat).
  6. Add the onions to the skillet, and sautée over medium heat until the onions turn golden brown, 8-10 minutes.
  7. Remove the onions from the heat, and place into the bottom of the slow cooker insert.
  8. Place the chuck roast on top of the onions, and then pour the sauce mixture over the chuck roast.
  9. Cover the meat, and cook on low for 8-10 hours, or on high for 4-5 hours.
  10. Once the meat has done cooking, you can shred the meat with a fork, plate and serve!  Be sure to use the liquid from the slower cooker as gravy/sauce for the pot roast.


Recipe inspired by Add a Pinch.


Leave a comment

Meaty Spaghetti Sauce

IMG_6824

It. Is. COLD.  The weather has taken a turn for the worst with the recent cold front affecting many parts of the United States.

Because of the cold, I’ve started the habit of running from my car to any building that I’m about to enter when I am out and about, so that I can get out of biting Oklahoma wind as quickly as possible.  And since it’s a poorly hidden secret that I really don’t enjoy running, you know it has to be pretty cold.

running

Weather like this begs for food that is warm and comforting.  But the start of a new year also means a fresh resolve to make healthy lifestyle choices that typically include a renewed focus on eating healthy, wholesome and nutritious foods.

You guys are in luck, because today’s recipe provides the best of both worlds.  This hearty spaghetti sauce is full of satiating protein and vitamin packed vegetables to keep you on track with your healthy eating goals, while providing the warmth and comfort you crave.

IMG_6791

The addition of balsamic vinegar adds a touch of subtle sweetness to the sauce without the addition of natural sweeteners, and the inclusion of dried parsley and chopped fennel seeds creates an additional level of complexity to the sauce without overpowering the other ingredients.

This meaty spaghetti sauce is perfect over spaghetti squash as a weeknight meal, after a long day at school or work.   I sprinkled a small amount of Manchego cheese on top (you can also use parmesan or mozzarella) to add a creamy texture to the sauce (and because cheese, if you can tolerate dairy, is amazing).

IMG_6845

Meaty Spaghetti Sauce with Spaghetti Squash

Servings: serves 5-6


Ingredients:

  • 1 large Spaghetti Squash
  • 1/2 tablespoon butter *
  • 1/2 large onion, diced
  • 1/2 pound ground beef
  • 1/2 pound ground pork
  • 1/2 red bell pepper, diced
  • 1/2 green bell pepper, diced
  • 1/2 tablespoon fennel seed, chopped
  • 2 tablespoon dried parsley
  • 2 tablespoons balsamic vinegar
  • 2 cloves garlic, minced
  • 28 ounce can diced tomato
  • 15 ounce can tomato sauce
  • 6 ounce can tomato paste
  • 1 teaspoon dried oregano
  • 1 teaspoon dried thyme
  • 1 teaspoon dried basil
  • 1 teaspoons sea salt
  • 1/2 teaspoon ground black pepper

Instructions:

  1. Preheat oven to 425 degrees.
  2. Line a large baking sheet with parchment paper.
  3. Chop spaghetti squash in half lengthwise, and scoop out the seeds.*
  4. Place the spaghetti squash cut side down, and bake in the oven for approximately 40-45 minutes.
  5. Once cooked, take the spaghetti squash out of the oven, flip the halves over and let cool.
  6. Once the spaghetti squash has cooled enough to handle, use a fork to scrap the squash noodles into a large bowl.
  7. Heat butter over medium high heat.  Add onion, and cook over medium high heat until the onion becomes translucent, approximately 5-8 minutes, stirring frequently.
  8. Add the ground beef and ground pork, and continue cooking until meat has browned.
  9. Add remaining ingredients and bring them to a boil.
  10. Once the mixture has reached a boil,  reduce the heat to medium low, and simmer the sauce on the stove for approximately one hour.
  11. Once the spaghetti sauce has finished cooking, remove from heat, and serve with the spaghetti squash.

Notes:

  •  Quick tip, to make the spaghetti squash easier to cut, microwave for 1-2 minutes.  This makes the shell a little softer, so that you don’t have to hammer away at the shell.
  • to make whole30 friendly, use ghee, avacado oil, lard, tallow or some other type of whole30 approved cooking fat.


Leave a comment

Browned Butter Banana Bread with Paleo Nutella Swirl

IMG_8180

I’m somewhat of a procrastinator in certain areas of my life.  Don’t get me wrong, I like to make lists and then check things off. A checked off list makes me feel all warm and fuzzy inside.  But sometimes, I just want to sit on my couch and read a kindle book, instead of acting like a grown-up (aka, doing my chores).  This is especially true on Sunday afternoons after I’ve finished meal prepping for the week, but before the laundry is done and the pile of dishes from meal prep have been washed.

However, I would recommend not procrastinating in making this banana bread.

This recipe is based off of my recipe for Paleo Pumpkin Chocolate Layered Bread with Chocolate Chips and Walnuts.  The addition of browned butter to this recipe adds another level of taste to an otherwise great recipe.  Browning butter is a technique that involves melting butter over medium to medium-high heat on the stove.  Heating butter after it melts results in the milk solids in the butter beginning to brown.  As the milk solids begin to brown, the butter gives off a nutty aroma.  The browned butter adds a nutty and slight butterscotch flavor to recipes.  I’ve added browned butter to several recipes, including cookies, sweet potatoes, and mashed cauliflower.

The addition of browned butter to this recipe for banana bread enhances the flavor of the walnuts, and adds a richness and depth to the overall taste of the bread.

IMG_8174

This banana bread is decadent, rich, and moist, and the combination of ingredients allows the flavors to combine to create a taste sensation sure to please a hungry crowd.

This banana bread would be great for a holiday party, or for Christmas breakfast/brunch.  Enjoy!

IMG_8197

Browned Butter Banana Bread with Paleo Nutella Swirl

Servings: makes 12-15


Ingredients:

  • 1 cup almond flour
  • 1 cup banana, mashed (2-3 small overly ripe bananas)
  • 1/2 cup tapioca flour
  • 1/2 cup butter
  • 2/3 cup Paleo Nutella
  • 1/3 cup honey
  • 1/4 cup coconut flour (sifted)
  • 1/4 cup chopped walnuts
  • 3 eggs, beaten
  • 1 tablespoon vanilla extract
  • 1 ½ teaspoons cinnamon
  • 1 teaspoon baking soda
  • 1 teaspoon baking powder
  • 1/2 tsp teaspoon salt
  • 1/2 tbs coconut oil (to grease the pan)

Instructions:

  1. Preheat oven to 350 degrees.
  2. Preheat a medium sauce pan over medium-high heat. Once the pan is hot, add ½ cup of butter to the pan and allow the butter to melt.
  3. Stir the butter constantly in the sauce pan as it melts. After the butter has melted, it will begin to foam.  As the butter foams, the milk solids from the butter will begin to darken, turning first to a tan color, and then to brown as it continues to cook.  As the butter browns, it will give off a slightly nutty aroma.  As soon as the solids turn from tan to brown and give off the nutty aroma, remove the sauce pan from heat immediately so that the milk solids do not burn.  Set aside to cool.
  4. Grease a 9 x 5 x 3 inch bread pan with coconut oil (you can also use butter), and then line the bottom of the pan with parchment paper.
  5. In a large mixing bowl, add almond flour, tapioca flour, coconut flour, cinnamon, baking soda, baking powder and sea salt.  Stir to combine.  Set aside.
  6. In a separate bowl, add eggs, mashed banana, honey and vanilla extract.  Stir to combine.  Then add the browned and cooled butter, and stir to combine.
  7. Pour the liquid ingredients into the dry ingredients, and stir the mixture thoroughly to incorporate.
  8. Let the batter sit on the counter for 3-4 minutes (this lets the coconut mixture soak up the moisture).
  9. Add Paleo Nutella to the batter, and gently swirl the Paleo Nutella through the bread batter using a spatula (do not fully incorporate the Paleo Nutella into the batter).
  10. Add the bread batter to the coated bread pan.
  11. Place the bread pan in the preheated oven and bake the bread for 50-55 minutes, until a toothpick inserted into the bread comes out clean.
  12. Once the bread is finished, remove from the oven and let cool on the counter for 5 to 10 minutes before removing the loaf of bread from the bread pan to cool further.
  13. Serve and enjoy!


1 Comment

Chocolate Hazelnut-Almond Spread (aka Paleo Nutella)

I’ve been a CrossFitter for over three years, and the majority of my time has been spent at CrossFit 405, a CrossFit gym near downtown Oklahoma City.  My local gym (or box, whatever you prefer) has been a place for me to push myself to my physical limits and get out of my comfort zone.  I’ve done some pretty amazing things over the past three years that I didn’t think my body could do.  In the process, I’ve gotten a lot stronger, both mentally and physically.

I’m still on the journey to becoming healthier, and that journey has been much more enjoyable with the gym family I’ve made at CrossFit 405.

My gym recently celebrated its fifth anniversary with a party/fundraiser (the fundraiser was for the McCloud Fire Department, a small town near Oklahoma City where one of our coaches works as a firefighter) last Saturday, December 6.  The celebration included the following WOD:

(12 min time cap) Partner WOD 3 Rounds For Time:

200ft single farmers (Rx135lb/95lb) and sandbag (Rx 75lb) carry.

IMG_9677

IMG_9480

While one partner did the farmers carry, the other partner did burpees.  Each burpee shaved a second of the total time for the farmers carry.

IMG_9698

IMG_9641

The anniversary party included some smaller challenges, as well as time for people to just hang out and chow down some tasty grub (because CrossFitters like to put food away!).

IMG_0036

Many of my friends at CrossFit 405 are happy to help me taste test my recipes before I post them on the blog.  They always give me their honest feedback (whether I like it or not), and help me step up my game so that I make sure and share recipes with you that make your taste buds happy.

My recipe for Chocolate Hazelnut-Almond Spread got a big thumbs-up from my CrossFit 405 taste testers.  Since I made several test batches to perfect the recipes, there was plenty to share!

IMG_8130

The spread is reminiscent of nutella, although it has a much cleaner profile.  Several of my taste testers reported eating the Chocolate Hazelnut-Almond Spread straight out of the jar!  The Chocolate Hazelnut-Almond Spread is very versatile treat.  You can use it as a fruit dip for guests, or eat it with Paleo/Gluten-Free pancakes or waffles during a weekend brunch.

IMG_8161

I used the Chocolate Hazelnut-Almond Spread as the base for another recipe, which I will be sharing with you in my next blog post (so make sure to check back next week)!

Do you CrossFit?  If so, I’d love to hear about your CrossFIt community.  Are there any other workout styles you love? Feel free to share about what workouts make your body feel better in the comments below!

Chocolate Hazelnut-Almond Spread (aka Paleo Nutella)

IMG_8134


Ingredients:

  • 1 1/2 cups roasted hazelnuts
  • 1 1/2 cups coconut milk (canned)
  • 3/4 cup raw almonds
  • 1/4 cup coconut sugar
  • 12 ounces dark chocolate chips
  • 2 tablespoons honey
  • 2 tablespoons cocoa powder
  • 2 tablespoons coconut oil
  • 2 teaspoons of vanilla
  • 1/2 teaspoon sea salt

Directions:

  1. Preheat oven to 350 degrees.
  2. On a baking sheet lined with parchment paper, spread the hazelnuts and almonds in a single layer  (making sure to keep the different nuts separate) and roast for 12-13 minutes, stirring them at the half way point during the roasting process.
  3. Remove the hazelnuts and almonds from the oven and set aside to cool.  Once the nuts have cooled, place the hazelnuts in a cloth napkin and rub together in the napkin to remove some of the skin (note that some skin will still remain on the hazelnuts no matter how much you rub, which is ok).
  4. Pour the dark chocolate chips in a microwave safe bowl.  Place the bowl in the microwave, and heat on high for 25-30 seconds. Remove bowl from the microwave and stir the dark chocolate chips.  Place the bowl back in the microwave and heat an additional 25-30 seconds.  Continuing the process of heating and stirring the dark chocolate chips until the dark chocolate chips have melted completely.
  5. Pour the roasted hazelnuts and almonds into the bowl of a high powered food processor.  Blend nuts in the food processor on high until the nuts turn into a thick paste, which should take 2-4 minutes (depending on the power of your blender).
  6. Add the remaining ingredients to the food processor, and continue to blend another 2-3 minutes until the ingredients have fully incorporated and the mixture is smooth and creamy.
  7. Store in an airtight container in the refrigerator for up to 2-3 weeks.


3 Comments

Mexi-Cauli Rice Bowl

Thanksgiving last week was awesome, because I was able to spend time with my family, including my adorable nephew Tayo.  My family lives in Texas, while I live in Oklahoma, so I don’t see my nephew as often as I would like.  He is full of energy and spunk, and his laughter and smiles make everything better (but when he is hungry, you better watch out, cause he’ll let you know how he feels 😉 ).

Every Thanksgiving, my parents invite relatives and friends from their local church to celebrate Thanksgiving.  We have a large potluck at my parent’s house, and this year I  whipped up some of my favorite Thanksgiving dishes, including a green bean casserole and sweet potato casserole.  My sweet potato casserole is a family favorite, and is usually polished off before the end of dinner.

I’m Nigerian-American, and we also have several Nigerian dishes as well, like Jollof Rice (rice cooked with tomato stew and spices), Moi Moi (a dished made from black beans), meat pies and fried plantains.

I love having family and friends come together to celebrate and give thanks for health, well being, and being able to gather together and celebrate the holidays.  However, one of the absolutely best parts about Thanksgiving in Texas, is that I don’t have to worry about finishing off leftovers!  By the time I make it back home, turkey (and any other leftovers) are the last things I want to eat.

If you’re also tired of turkey, ham, and casseroles, than I have a ground beef and vegetable dish that is sure to make your tastebuds happy!

IMG_7954

IMG_8016

This dish was inspired by my desire for latin american flavored meal without being too carb-heavy.  With low-carb veggies like cauliflower and green and red bell peppers, and ground beef flavored with spices like cumin, chili powder and oregano, you are going to enjoy this flavor combination.

IMG_7960

Depending on your tolerance for spicy foods, you can also kick it up a notch by adding more red pepper flakes.

I’d love to know how your Thanksgiving went!  Feel free to leave a comment below sharing your favorite traditional (and non-traditional) Thanksgiving dishes.  If you make the Mexi-Cauli Rice Bowl, please let me know what you think!

IMG_8083

Mexi-Cauli Rice Bowl

Servings: serves 3-4


Ingredients:

  • 1 pound ground beef
  • 1 large head of cauliflower, chopped into florets
  • 1 14 oz can diced tomato
  • 1 large red onion, diced
  • 1 large red bell pepper, diced
  • 1 large green bell pepper, diced
  • 3 cloves of garlic, minced
  • 1 1/2 tablespoons chili powder
  • 2 1/2 teaspoons sea salt
  • 1 teaspoon ground black pepper
  • 1 teaspoon cumin
  • 1/2 teaspoon dried oregano
  • 1/2 teaspoon paprika
  • 1/4 teaspoon red pepper flakes (optional)
  • 1 tablespoon cooking fat (lard, tallow, coconut oil, butter, avocado oil)

Instructions:

  1. Process the cauliflower florets into cauliflower rice by using the shredding attachment on a food processor.  If you don’t have access to a food processor, you can “rice” the cauliflower by using a handle held food grater.  Pour the cauliflower rice into a large bowl and set aside.
  2. Preheat a large skillet over medium high heat.  Add the ground beef and all of the spices (but reserving 1 teaspoon of sea salt).  Cook the ground beef over medium high heat until browned, approximately 10-12 minutes.
  3. Once the meat has browned, add the diced tomatoes and lower the heat to medium-low, simmering the browned beef and diced tomatoes for 15-20 minutes.  Once the browned beef has finished simmering, remove from heat and set aside.
  4. While the beef and diced tomatoes are simmering, preheat a large pot over medium high heat.  Then add 1 tablespoon of the cooking fat to the pot.
  5. Once the cooking fat has heated, add the minced garlic and sautee for 20-30 seconds.  Add the diced onions and sautee an additional 4 to 5 minutes.
  6. Add the diced red and green bell peppers to the large pot, and continue sauteeing for 6-7 minutes.
  7. Add the cauliflower rice to the large pan, and mix with the diced onions and bell peppers until combined.
  8. Continue cooking the cauliflower mixture, stirring the mixture periodically until the rice has softened, 8-10 minutes.
  9. Once the cauliflower rice mixture has cooked through, remove from heat.
  10. Mix the cauliflower rice mixture with the beef and diced tomatoes, and stir to thoroughly combine.
  11. serve immediately.


Notes:

  • This meal makes great leftovers.