baconwrappedbarbells


Leave a comment

Chestnut Flour Tortillas (Paleo friendly, Gluten-free, Grain-free)

139A9244

This recipe involves chestnut flour, which isn’t commonly used, even in gluten-free baking.  Chestnut flour is made from chestnuts that have been dried, the outer peel removed and then ground.  The result is a very fine powder that looks gray-tan in color.  Chestnut flour is typically imported from France or Italy.  Chestnut flour has a sweet flavor, and is commonly used in a variety of Italian dessert recipes.  It’s also used to make pasta, breads, and other savory dishes.

139A9250

I first learned about chestnut flour when I saw a post for a Paleo chocolate chip cookie recipe from James Trenda on Instagram.  The cookies looked drool worthy, and I was excited to try out a new gluten-free chocolate chip recipe that had promising results.  I wasn’t able to locate chestnut flour in any local stores, but Amazon carries the flour online.  The cost for chestnut flour is somewhat pricey, but I decided to bite the bullet and get it.  Thankfully, the results were worth it.  The cookies were completely out of this world, and my friends (both Paleo and gluten-loving) gave them a big thumbs up!

139A9307

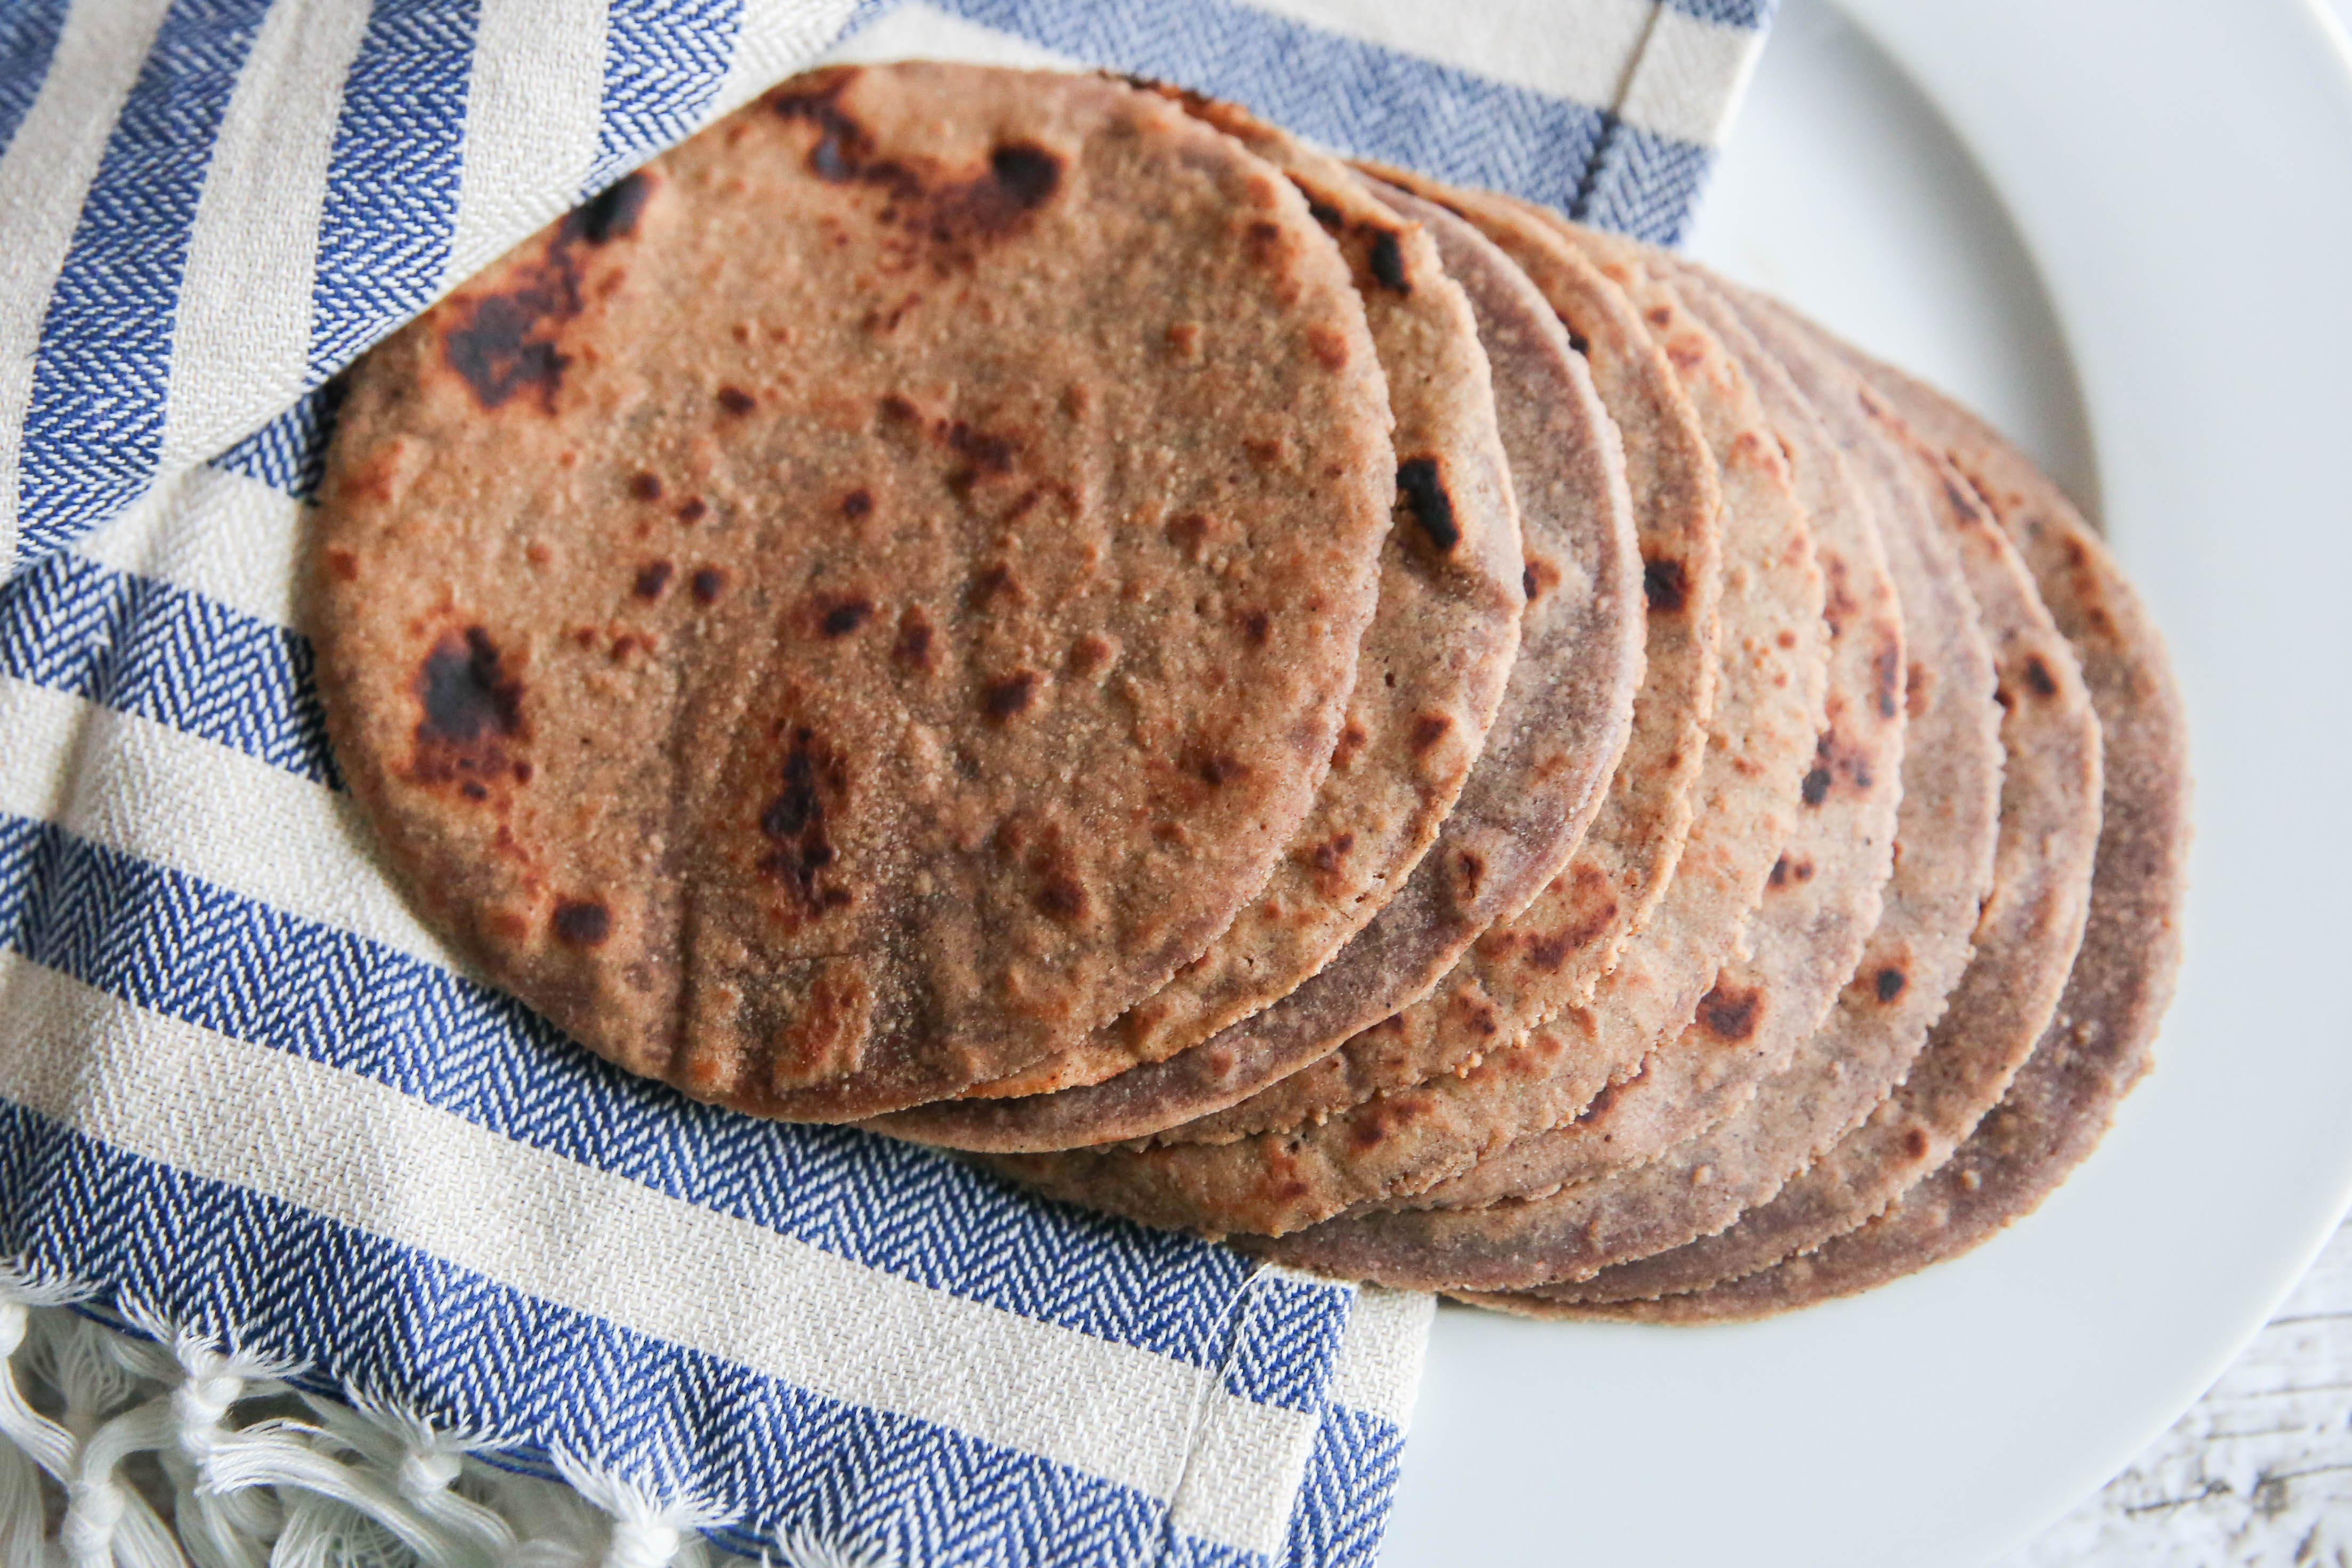
I had leftover chestnut flour after making the chocolate chip cookie recipe, and decided to experiment with the flour in other types of baking.  My first experiment involved making gluten-free tortillas, and now I get to share the results with you guys!

Enjoy and as always, please share your results in the comments below.

Chestnut Flour Tortillas

Recipe adapted from Serious Eats Flour Tortilla recipe.

Servings: 4-5


Ingredients:

  • 1 and 1/2 cups chestnut flour
  • 1/2 cup tapioca flour
  • 3/4 cup cold water
  • 1/4 cup organic vegetable shortening (can use butter or lard to make Paleo friendly )
  • 1 teaspoon sea salt

Instructions:

  1. In a medium-sized bowl, whisk together the chestnut flour, tapioca flour and salt.
  2. Add in vegetable shortening, and using a fork press the shortening into the flour (flour will be somewhat crumbly, make sure no large chunks of shortening remain).
  3. Add water to the bowl, and mix until the dough is smooth and sticks together (If the dough is too wet, add more chestnut flour.  If the dough is too dry, add water, one teaspoon at a time until the dough reaches the right consistency).
  4. Lightly sprinkle a clean surface with chestnut flour, and knead the dough for approximately 1 minute.
  5. Let the dough rest for 30 minutes.
  6. After the dough has rested, shape the dough into 8-10 balls (depending on how big you want them), and place the balls back in the bowl. Cover the bowl with a towel so that the dough retains its moisture.
  7. Heat a cast iron skillet to medium-high heat.
  8. While the skillet is heating up, flatten a ball of dough using a tortilla press (if you don’t have a tortilla press, place the dough in between two pieces of parchment paper and flatten using a rolling pin).
  9. Once the skillet is heated, place the flatten dough into the skillet until bubbles begin forming and bottom begins to slightly brown, approximately 45 to 60 seconds.
  10. Flip the tortilla over and cook an additional 30-45 seconds. Then remove the tortilla from the heat.
  11. Repeat steps 8 through 10 to cook the remaining tortillas.

139A9305


Leave a comment

Browned Butter Banana Bread with Paleo Nutella Swirl

IMG_8180

I’m somewhat of a procrastinator in certain areas of my life.  Don’t get me wrong, I like to make lists and then check things off. A checked off list makes me feel all warm and fuzzy inside.  But sometimes, I just want to sit on my couch and read a kindle book, instead of acting like a grown-up (aka, doing my chores).  This is especially true on Sunday afternoons after I’ve finished meal prepping for the week, but before the laundry is done and the pile of dishes from meal prep have been washed.

However, I would recommend not procrastinating in making this banana bread.

This recipe is based off of my recipe for Paleo Pumpkin Chocolate Layered Bread with Chocolate Chips and Walnuts.  The addition of browned butter to this recipe adds another level of taste to an otherwise great recipe.  Browning butter is a technique that involves melting butter over medium to medium-high heat on the stove.  Heating butter after it melts results in the milk solids in the butter beginning to brown.  As the milk solids begin to brown, the butter gives off a nutty aroma.  The browned butter adds a nutty and slight butterscotch flavor to recipes.  I’ve added browned butter to several recipes, including cookies, sweet potatoes, and mashed cauliflower.

The addition of browned butter to this recipe for banana bread enhances the flavor of the walnuts, and adds a richness and depth to the overall taste of the bread.

IMG_8174

This banana bread is decadent, rich, and moist, and the combination of ingredients allows the flavors to combine to create a taste sensation sure to please a hungry crowd.

This banana bread would be great for a holiday party, or for Christmas breakfast/brunch.  Enjoy!

IMG_8197

Browned Butter Banana Bread with Paleo Nutella Swirl

Servings: makes 12-15


Ingredients:

  • 1 cup almond flour
  • 1 cup banana, mashed (2-3 small overly ripe bananas)
  • 1/2 cup tapioca flour
  • 1/2 cup butter
  • 2/3 cup Paleo Nutella
  • 1/3 cup honey
  • 1/4 cup coconut flour (sifted)
  • 1/4 cup chopped walnuts
  • 3 eggs, beaten
  • 1 tablespoon vanilla extract
  • 1 ½ teaspoons cinnamon
  • 1 teaspoon baking soda
  • 1 teaspoon baking powder
  • 1/2 tsp teaspoon salt
  • 1/2 tbs coconut oil (to grease the pan)

Instructions:

  1. Preheat oven to 350 degrees.
  2. Preheat a medium sauce pan over medium-high heat. Once the pan is hot, add ½ cup of butter to the pan and allow the butter to melt.
  3. Stir the butter constantly in the sauce pan as it melts. After the butter has melted, it will begin to foam.  As the butter foams, the milk solids from the butter will begin to darken, turning first to a tan color, and then to brown as it continues to cook.  As the butter browns, it will give off a slightly nutty aroma.  As soon as the solids turn from tan to brown and give off the nutty aroma, remove the sauce pan from heat immediately so that the milk solids do not burn.  Set aside to cool.
  4. Grease a 9 x 5 x 3 inch bread pan with coconut oil (you can also use butter), and then line the bottom of the pan with parchment paper.
  5. In a large mixing bowl, add almond flour, tapioca flour, coconut flour, cinnamon, baking soda, baking powder and sea salt.  Stir to combine.  Set aside.
  6. In a separate bowl, add eggs, mashed banana, honey and vanilla extract.  Stir to combine.  Then add the browned and cooled butter, and stir to combine.
  7. Pour the liquid ingredients into the dry ingredients, and stir the mixture thoroughly to incorporate.
  8. Let the batter sit on the counter for 3-4 minutes (this lets the coconut mixture soak up the moisture).
  9. Add Paleo Nutella to the batter, and gently swirl the Paleo Nutella through the bread batter using a spatula (do not fully incorporate the Paleo Nutella into the batter).
  10. Add the bread batter to the coated bread pan.
  11. Place the bread pan in the preheated oven and bake the bread for 50-55 minutes, until a toothpick inserted into the bread comes out clean.
  12. Once the bread is finished, remove from the oven and let cool on the counter for 5 to 10 minutes before removing the loaf of bread from the bread pan to cool further.
  13. Serve and enjoy!


Leave a comment

Mongolian Beef

I have many friends who eat a gluten-free and/or grain-free diet, either for weight-loss, medical reasons, or as part of an overall healthy lifestyle.  But I also have many friends that don’t, and within that subset are friends that seem dubious over the possibility of eating gluten-free meals that actually taste good.

Just so you know, when I cook for a non-paleo palate, my priority is serving meals that taste good.  I don’t ever plan on springing  organ meats and fermented foods to my dinner guests the first time they come over.  Let’s be real, even I don’t eat that kind of stuff (I have beef liver sitting in my freezer, and still don’t have the courage to actually make a meal out of it).  My goal is to make foods that are so delicious, no one questions whether or not it is “weird diet food.”

One of my go to recipes that never disappoints in flavor is Mongolian Beef from The Iron You.  This recipe is full of flavorful ingredients like fresh ginger and minced garlic, and the dish can be paired with white rice or cauliflower rice (if you want to keep it lower in carbs).

My friend Krystal and her boyfriend Josh were in town for the weekend, and came over Sunday afternoon for lunch.  Since I knew it had never failed me before, I figured Mongolian Beef would be the perfect meal to share with them.

IMG_9650

Krystal was in town this weekend for a wedding reception.  I always love hanging out with her and sharing about some of our favorite things (which include cupcakes and working out).  With a sweet personality and infectious smile, it’s hard to be in a bad mood when she is around.  She has her own blog Moving Wright Along which I recommend you check out, where she shares her adventures in healthy living while going back to school to become a Registered Dietitian.

As I knew it would, the meal did not disappoint.  Krystal’s boyfriend Josh doesn’t a eat gluten-free diet, but liked it so much that he hinted to Krystal that he wouldn’t mind this meal being included in their regular dinner rotation.  Recipe success!

I hope you like the recipe as much as Krystal and Josh did.

IMG_9597

Recipe

Mongolian Beef – recipe adapted from The Iron You.

Servings: serves 3-4


Ingredients

  • 1 pound flank steak, thinly sliced
  • 1/2 cup coconut aminos
  • 1/2 cup water
  • 1/3 cup coconut sugar
  • 2 tablespoons olive oil, plus two teaspoons olive oil (divided)
  • 4 cloves of garlic, minced
  • 1 tablespoon fresh ginger, peeled and grated
  • 1/4 cup arrowroot powder
  • 1 teaspoon red pepper flakes (optional)
  • 1/4 teaspoon ground black pepper
  • 2 scallions, sliced thinly

Instructions:

  1. Combine the coconut aminos and water into a small bowl.
  2. Heat two teaspoons of olive oil in a saucepan over medium heat.
  3. To the heated oil, add the ginger and garlic and saute for 30 seconds, and then quickly add the coconut aminos/water mixture before the garlic scorches.
  4. To the saucepan, add the coconut sugar, ground black pepper and red pepper flakes (if using)
  5. Raise the heat on the mixture and simmer for about 4 to 5 minutes, until the sauce thickens.
  6. Remove the saucepan from the heat and set aside.
  7. Combine beef slices and arrowroot powder in a ZipLock bag (or in a shallow dish) and toss until all beef slices are evenly coated.
  8. Heat remaining 2 tablespoons of olive oil in a large frying pan (or wok), until it’s hot but not smoking. Add beef and saute/stir-fry for 2-3 minutes, until it begins to darken around the edges, stirring every now and then so that it cooks evenly.
  9. Remove the beef from the frying pan and clean the pan (but be careful, since the pan will be hot).
  10. Return the pan back over the heat, add the meat and simmer for one minute.   Then add the sauce and cook for one additional minute stirring constantly.
  11. Add the green onions and cook for one further minute.
  12. Transfer to a plate leaving the excess sauce in the pan and serve.